We use Debian to finish the demo.
Both of below are basic command line, If you are not familiar with command line in Linux, you should learn it first.
Update & Upgrade
1 | $ apt-get update |
You must curious what’s difference between update and upgrade.
update
Used to re-synchronize the package index files from their sources. The indexes of available packages are fetched from the location(s) specified in /etc/apt/sources.list(5). An update should always be performed before an upgrade or dist-upgrade.
upgrade
Used to install the newest versions of all packages currently installed on the system from the sources enumerated in /etc/apt/sources.list(5). Packages currently installed with new versions available are retrieved and upgraded; under no circumstances are currently installed packages removed, nor are packages that are not already installed retrieved and installed. New versions of currently installed packages that cannot be upgraded without changing the install status of another package will be left at their current version. An update must be performed first so that apt-get knows that new versions of packages are available.
Htop, Vim & Screen
1 | $ apt-get install htop |
These packages can improve your effective.
htop: [htop][htop] command like [top][top] command, both of these are interactive process viewer for Unix systems. Its help you manage process and monitor resource easy. But [htop][htop] is more convenient than [top][top].
- In ‘htop’ you can scroll the list vertically and horizontally to see all processes and complete command lines.
- In ‘top’ you are subject to a delay for each unassigned key you press (especially annoying when multi-key escape sequences are triggered by accident).
- ‘htop’ starts faster (‘top’ seems to collect data for a while before displaying anything).
- In ‘htop’ you don’t need to type the process number to kill a process, in ‘top’ you do.
- In ‘htop’ you don’t need to type the process number or the priority value to renice a process, in ‘top’ you do.
- ‘htop’ supports mouse operation, ‘top’ doesn’t
- ‘top’ is older, hence, more used and tested.
From http://hisham.hm/htop/index.php?page=comparison
vim: [vim][vim] is almost a proper superset of [vi][vi], everything that is in vi is available in vim.
screen:
- use multiple shell window from a single SSH session
- Keep a shell active even through network disruptions
- Disconnect and re-connect to a shell sessions from multiple locations
- Run a long running process without maintaining an active shell session
Usage
screen uses the command ctrl-a that’s the control key and a lowercase “a” as a signal to send commands to screen instead of the shell.
start: screen
creating: Ctrl-a c
switch: Ctrl-a n for the next window or Ctrl-a p for the previous window.
detach: Ctrl-a d
reattach: Ctrl-a r
logging: Ctrl-a h
lock: Ctrl-a x
stop: Ctrl-a k
Group & User
1 | $ groupadd |
useradd
user add will auto create group that the name same as user
1 | $ useradd chang # craete user "chang" |
the meaning of files that user and group saved
- /etc/passwd – User account information.
- /etc/shadow – Secure account information.
- /etc/group – Group account information.
- /etc/gshadow – Secure group account information.
- /etc/login.defs – Shadow password suite configuration..
/etc/passwd format:
username:password:uid:gid:userInfo:homeDirectory:shell
/etc/group format:
groupname:password:gidd:groupMembers
usermod
for more detail, to below to see
1 | $ usermod --help |
1 | $ usermod -G www chang # add www group to chang, Be careful, it will remove all existing groups that user belongs, so always add the '-a' with '-G' to append new groups |
chown
change file owner
1 | $ chown -hR www:www /home/www # chang the owner of /homw/www to www user and www group |
Nginx Install
As you know, you can install an application with few different methods, below we introduce three common methods to install Nginx.
Install from Debian repository
1 | $ apt-get install nginx |
you can verify the installation through:
1 | $ nginx -v |
and you can verify which module you are install through:
1 | $ nginx -V # Capital |
and you will get the default configuration like:
1 | nginx version: nginx/1.6.2 |
Note: this type can not get the latest version of the NGINX.
Install from Nginx repository
Download the key used to sign NGINX packages and repository to the apt program keyring and add it:
1
2
$ wget http://nginx.org/keys/nginx_signing.key
$ apt-key add nginx_signing.keyAdd the “sources” from which NGINX Open Source packages can be obtained: open the /etc/apt/sources.list file in any text editor, for example, vim:
1
$ vim /etc/apt/sources.list
Append the lines to the file:
1
2deb http://nginx.org/packages/mainline/debian/ codename nginx
deb-src http://nginx.org/packages/mainline/debian/ codename nginxwhere:
codename is a codename of a Debian release:Version Codename Supported Platforms 7.x wheezy x86_64,i386 8.x jessie x86_64,i386 Install
1
2
3
$ apt-get remove nginx-common
$ apt-get update
$ apt-get install nginxlist the default module that nginx installed
1
$ nginx -V
1
2
3
4
5nginx version: nginx/1.11.6
built by gcc 4.9.2 (Debian 4.9.2-10)
built with OpenSSL 1.0.1t 3 May 2016
TLS SNI support enabled
configure arguments: --prefix=/etc/nginx --sbin-path=/usr/sbin/nginx --modules-path=/usr/lib/nginx/modules --conf-path=/etc/nginx/nginx.conf --error-log-path=/var/log/nginx/error.log --http-log-path=/var/log/nginx/access.log --pid-path=/var/run/nginx.pid --lock-path=/var/run/nginx.lock --http-client-body-temp-path=/var/cache/nginx/client_temp --http-proxy-temp-path=/var/cache/nginx/proxy_temp --http-fastcgi-temp-path=/var/cache/nginx/fastcgi_temp --http-uwsgi-temp-path=/var/cache/nginx/uwsgi_temp --http-scgi-temp-path=/var/cache/nginx/scgi_temp --user=nginx --group=nginx --with-compat --with-file-aio --with-threads --with-http_addition_module --with-http_auth_request_module --with-http_dav_module --with-http_flv_module --with-http_gunzip_module --with-http_gzip_static_module --with-http_mp4_module --with-http_random_index_module --with-http_realip_module --with-http_secure_link_module --with-http_slice_module --with-http_ssl_module --with-http_stub_status_module --with-http_sub_module --with-http_v2_module --with-mail --with-mail_ssl_module --with-stream --with-stream_realip_module --with-stream_ssl_module --with-stream_ssl_preread_module --with-cc-opt='-g -O2 -fstack-protector-strong -Wformat -Werror=format-security -Wp,-D_FORTIFY_SOURCE=2' --with-ld-opt='-Wl,-z,relro -Wl,-z,now -Wl,--as-needed'
You can see the latest version of the NGINX installed to your system.
Install from open sources
As you see, these above two types to install NGINX is non-configurable, these are pre-build, so they already configure with default value. you can’t add or remove module and configure it. So if you want to add module or 3rd party module and apply latest security patches, I suggest you use this type to install NGINX.
the PCRE lirary - required by NGINX core and Rewrite modules and provides support for regular expressions.
1
2
3
4
5
6
$ wget ftp://ftp.csx.cam.ac.uk/pub/software/programming/pcre/pcre-8.39.tar.gz
$ tar -zxf pcre-8.39.tar.gz
$ cd pcre-8.39
$ ./configure
$ make
$ sudo make installthe zlib library - required by NGINX Gzip module for headers compression.
1
2
3
4
5
6$ wget http://zlib.net/zlib-1.2.8.tar.gz
$ tar -zxf zlib-1.2.8.tar.gz
$ cd zlib-1.2.8
$ ./configure
$ make
$ sudo make installthe OpenSSL library - required by NGINX SSL modules to support the HTTPS protocol.
1
2
3
4
5
6$ wget http://www.openssl.org/source/openssl-1.0.2f.tar.gz
$ tar -zxf openssl-1.0.2f.tar.gz
$ cd openssl-1.0.2f
$ ./configure darwin64-x86_64-cc --prefix=/usr
$ make
$ sudo make installThe header more nginx library - required by NGINX header more nginx module to change the response header information.
1
2
$ wget https://codeload.github.com/openresty/headers-more-nginx-module/tar.gz/v0.32
$ tar -zxf v0.32download the NGINX sources
1
2
3$ wget http://nginx.org/download/nginx-1.10.2.tar.gz
$ tar zxf nginx-1.10.2.tar.gz
$ cd nginx-1.10.2configure NGINX
Add above that you download module to NGINX, so you can use the module in NGINX.1
$ ./configure --prefix=/usr/local/nginx --sbin-path=/usr/local/nginx/nginx --conf-path=/usr/local/nginx/nginx.conf --pid-path=/usr/local/nginx/nginx.pid --with-pcre=../pcre-8.39 --with-zlib=../zlib-1.2.8 --with-http_ssl_module --add-module=../headers-more-nginx-module-0.32 --with-debug
link NGINX
Now, you can run nginx with full path – /usr/local/nginx/nginx, and you can browse it with localhost in any browser. But seems not convenient to run nginx with full path every time, so we link the nginx from local to sbin that you can run it without fullpath, just run nginx.1
$ ln -s /usr/local/nginx/nginx /usr/sbin/nginx
Now you can run nginx with nginx command without fullpath.
1 | $ nginx -V |
Configure web
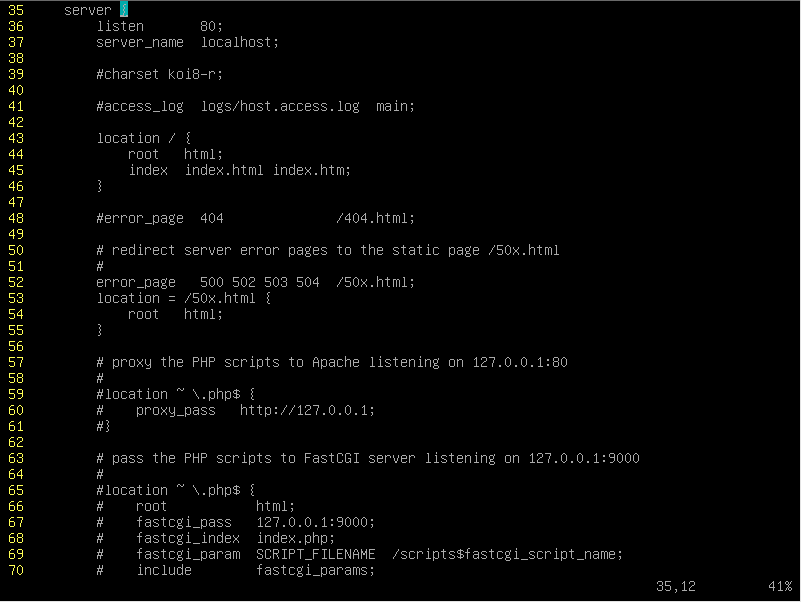
Now, you can access webpage in browser with default page in NGINX via localhost. So, the nginx.conf path is put in where we set during we configure NGINX – /usr/local/nginx/nginx.conf. Let’s look at the file via vim.
1 | $ cd /usr/local/nginx |
go to 35 line through 35 G

We drop the unnecessary code, and simplify the code and explain the meaning of the code to below:
1 | server { |
Now, we can configure a server by self, we make the root of the web server in /home/www, and write index.html, then open the nginx.conf to configure the new web server “Hello world”
1 | $ mkdir /home/www |
We append include conf.d/*.conf into nginx.conf at last second line. so we can add the server configure without pollute the origin configure. It will auto add all of the file that have .conf extension into nginx.conf.
1 | server { |
Then we reload the nginx server with:
1 | $ nginx -s reload |
Now, you can access www. http://localhost:8080/
change response header
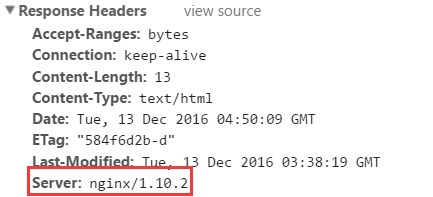
We already install the headers-more-nginx-module, so we can configure the response header. Before we configure it, let’s open the developers-tool in google-chrome, and look at the network request, we can get the response headers:

For some security reason, we don’t want to show Server information to client, so we can add the configuration to hello_world.conf.
1 | more_set_headers "Server" ""; # add this |
Then reload the nginx server:
1 | $ nginx -s reload |
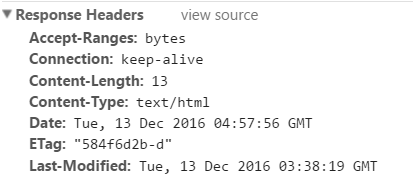
Then we reload the page in browser, and open the network, the Server information already drop.

Now, your nginx server is more safer than before you add the server information into response headers.
For more detail about the headers-more-nginx-module, see: https://github.com/openresty/headers-more-nginx-module
add module
If you want to add some module into NGINX that was installed, you have to download the module, then reconfigure NGINX with the module and compile it.
Tip
1 | $ man order # to see detail of the order |
Ref:
screen https://www.rackaid.com/blog/linux-screen-tutorial-and-how-to/#starting
useradd http://www.tecmint.com/add-users-in-linux/
usermod http://www.tecmint.com/usermod-command-examples/
permission http://www.tecmint.com/manage-users-and-groups-in-linux/
nginx https://www.nginx.com/resources/admin-guide/installing-nginx-open-source/
headers-more-nginx-module https://github.com/openresty/headers-more-nginx-module
[htop]: https://hisham.hm/htop/index.php
[top]: https://linux.die.net/man/1/top
[vim]: http://www.vim.org/
[vi]: http://ex-vi.sourceforge.net/
